Fix Objects and Exposure in a Portrait Photo using Photoshop Tools (Premium Content)
")
Please note: this is a members-only post for members who can access premium content. The full post is available to Plus and Pro members.
I don’t share many selfies or portraits of myself. But once in a while I get a decent one. The image in this post is from summer 2022 from a Tdot Shots photo walk at the gorgeous University of Toronto campus.
The photographer is Alicia aka @scorpionlensphotography and I really love this pic. But I decided to tweak and fix it before I shared it.
I edited about 3-4 aspects of the image and decided that it was worthy to share the process as many people in the community are new to Photoshop.
Let me say that I don’t always undertake so much editing. Usually I argue that the image should be near perfect before you consider doing this type of thing. And this image was soid so I felt it was worth it. I spent about 10 minutes on these fixes so it rates as easy.
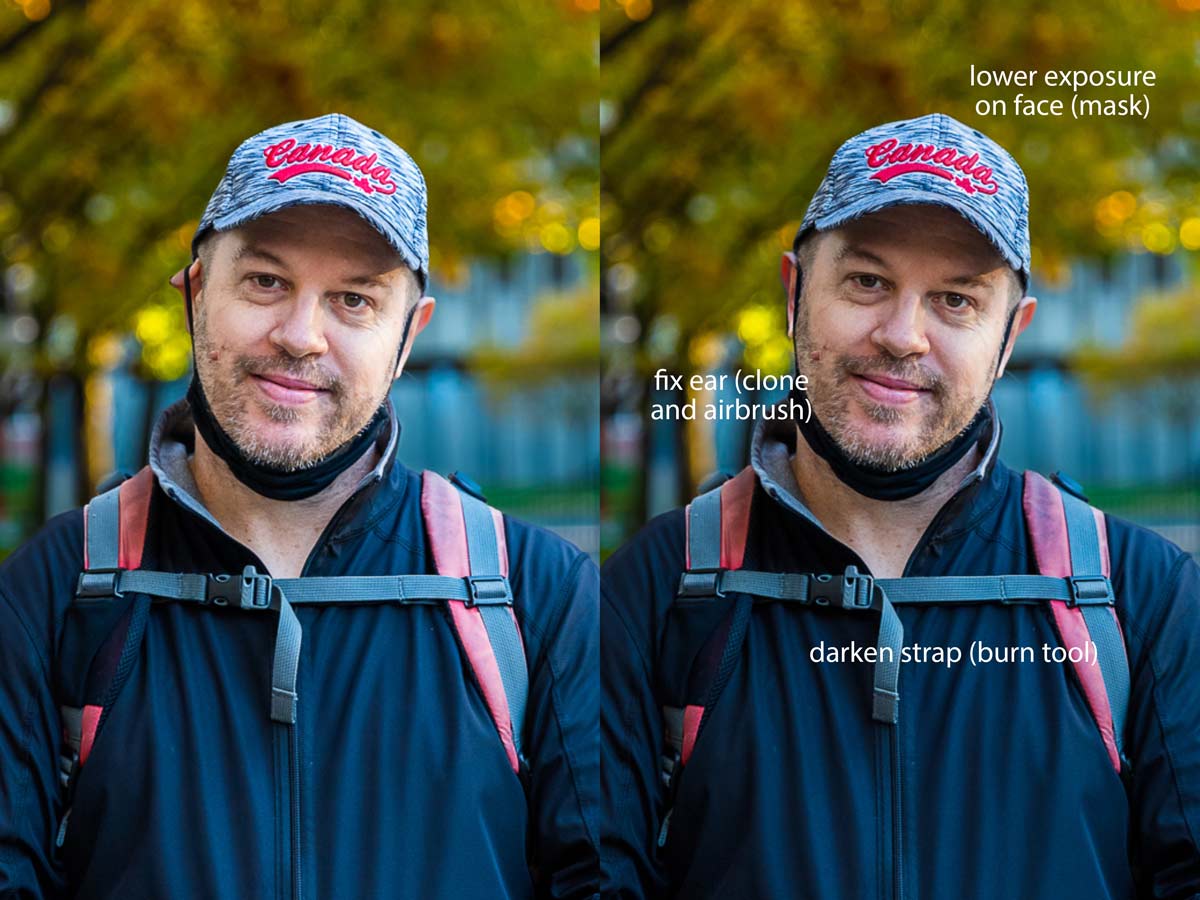
Original shot – What do you think needs fixing?
I love this photo. The depth of field is incredible. Alicia shot this with great settings for a shallow depth of field, perfectly blurring the background.

I think the edit is bright and positive. The face looks pretty bright decent yet doesn’t blow blow out the highlights. It’s a pretty sick shot overall.
However it immediately struck me that despite my mask not obstructing my face, my ear was bent awkwardly. I would have to fix that. I also felt the exposure needed a tweak. I love the background blur and dark quality to the trees. But my face was too bright. I needed to make contrast between foreground and background less dramatic.
Take a moment and consider the image. What stands out? What needs an adjustment or fix? Think about it before you continue.
Ready? Let me highlight for you the things I changed in the original and compare with the fixed version.
Here’s the side-by side of myself in the image:
Join Tdot Studio to get involved in our creator community.
Hello city explorers. I’m Mike. I’m passionate about arts and education in Toronto (aka Tdot). I host events and create media, including this site you’re reading right now.
Please contact me for information about photo walks, tours and events in the city. I’d be happy to share some tips & share the best of the city with you.
")


")